Nooelec SAWbird ADSB
NOTE: As an Amazon Associate, I may earn a commission from qualifying purchases made through links on this site (at no cost to you).
While looking through options for my plane tracking ADS-B and UAT setup, I came across this new product from Nooelec, the SAWbird+ ADS-B. It’s a dual-channel Ultra Low Noise Amplifier and SAW Filter for both ADS-B and UAT that claims to provide +34dB of gain for each band. Since my setup was recently expanded to monitor both bands, this was perfect for me, so I decided to pick one up and see how well it works. Today’s post will cover how to set it up and a test of the product.
Setup
I’ve used a number of Nooelec’s LNAs and labeling can be kind of confusing on them. For example, they will be labled Input and Output, but I feel like labels like Radio and Antenna would make things clearer. Aside from that, the setup is pretty straightforward once you figure the labeling out. In the case of this SAWbird ADS-B LNA, UAT Input and ADS-B Input are where you hook up to coax going to your antennas. The other side with labels of ADS-B Output & DC In and UAT Output & DC In are where the SDRs will plug into the device and they include male-to-male SMA adapters for this. The DC in labeling is because you can use an SDR with a Bias Tee, which is an SDR that can provide power over coax to an LNA. Nooelec sells some of these Bias Tee SDRs, but for testing, I’m using the RadarBox SDRs I already have. Since these SDRs don’t have Bias Tee, I will have to power the LNA a different way. The LNA also has a MicroUSB port on it that can also be used to power it, so I’m going this route. If this is a new setup, I recommend getting the Nooelec Bias Tee SDRs. While these SDRs don’t contain a filter for 1090 and 978, the SAWbird+ ADS-B I’m reviewing does, so filtered SDRs are not needed.
To set things up, simply hook up the antennas to the SMA connectors with the Input labels. Then hook up the male-to-male SMA adapters to the SMA connectors labeled Output and hook the SDRs to these. It was a tight fit with the RadarBox SDRs, so I had to squeeze them together a bit to make them fit into the Raspberry Pi USB ports. It wasn’t such a tight fit that it concerned me, but you could buy short USB extensions if you’re uncomfortable with this. After connecting these components, provide power to the LNA if you’re not using a Bias Tee SDR.
Testing
To test the difference the LNA makes, the easiest way to see the results is to go to the Graphs1090 page and review the graphs. You’ll actually clearly see results in most of the graphs, including the CPU-related ones.
Since I’ve already been testing the device for a while, I decided to unplug it and hook the antennas directly to the SDRs. That was late afternoon on Friday, and it’s now Saturday morning after plugging it back in, so let’s have a look at the difference.
ADS-B Message Rate
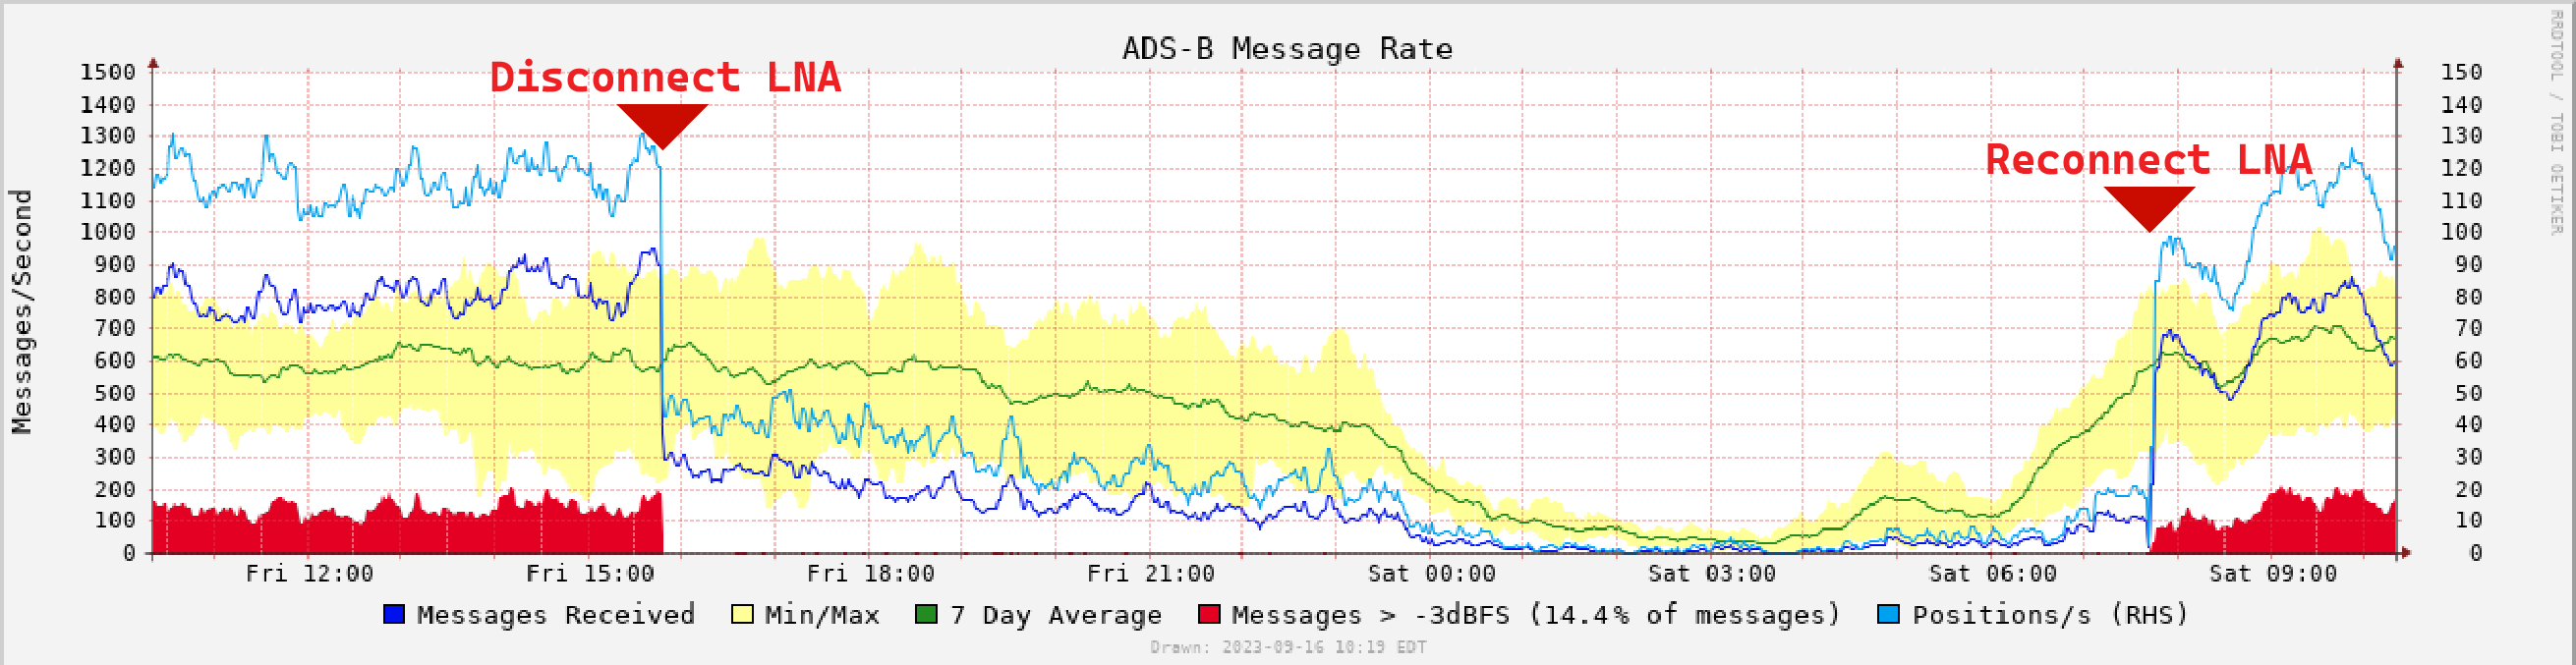
As we look at the first graph on the Graphs1090 page, we can clearly see when the LNA was disconnected on Friday with the sharp drop of Messages Received and Positions. After it was reconnected on Saturday, we can see the sharp jump. It’s not quite at the level it was on Friday with it connected, but that is due to there being less air traffic on Saturdays.
ADS-B Range
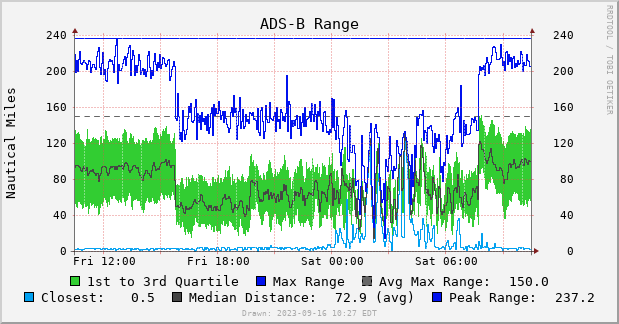
Looking at the range graph, we can also see an increase here as well, with the max range around 140-150 miles with no LNA and jumping up to around 210 miles with the LNA connected.
ADS-B Signal Level

Looking at this graph, you can also clearly see a significant improvement with the LNA connected. You may also notice in this graph that the Peak Level line is a straight line with the LNA connected, whereas it’s more jagged with it disconnected. This is due to the signal level literally being off the charts, as this graph does not go above 0dB. I was not able to find a way to change this to show above 0dB, unfortunately.
Remaining graphs
Looking through some of the remaining graphs, we can also clearly see the differences there as well. Including the CPU usage graph which confirms that more data is being processed by the system.


Closing Thoughts
In conclusion, the Nooelec SAWbird+ ADS-B has proven to make a significantly noticeable difference in the performance of my ADS-B and UAT setup for plane tracking. If you have an ADS-B and UAT
The results shown on the Graphs1090 page clearly show increases in messages received, number of aircraft seen, signal gain, and the range of coverage extended to approximately 210 miles; a notable increase from the 140-150 miles achieved without the LNA. The Nooelec SAWbird+ ADS-B has exceeded expectations, and I would consider it a must-have for any aviation enthusiasts looking to enhance their ADS-B and UAT tracking setup.
If interested, the Nooelec SAWbird+ ADS-B can be purchased using the Amazon affiliate link below https://amzn.to/3PpTNvY